Version: 8.3.0
By purpose, the sub-mesh is an object used to assign to a sub-shape different meshing parameters than those assigned to the main shape.
Structurally, the sub-mesh is a mesh on a certain sub-shape, or a group of sub-shapes, possibly generated using different meshing algorithms and/or hypotheses than those used to generate the mesh on other sub-shapes.
Creation of a sub-mesh allows to control individually meshing of a certain sub-shape, thus to get a locally coarser or finer mesh, to get elements of different types in the same mesh, etc.
A sub-mesh can be meshed individually. To achieve this, select a sub-mesh and either invoke Compute Sub-mesh vai the contextual menu in the Object Browser or invoke Mesh > Compute menu.
A sub-shape to create a sub-mesh on should be retrieved from the main shape in one of the following ways:
Internally, definition of meshing parameters to apply for discretization of a certain sub-shape, for example an edge of a compound of solids, starts from searching an algorithm, 1D as for the edge. The following sub-shapes are sequentially checked for presence of a sub-mesh where 1D algorithm is assigned:
(This sequence of sub-shapes defines the priority of sub-meshes. Thus more local, i.e. assigned to sub-shape of lower dimension, algorithms and hypotheses have higher priority during the search of hypotheses to apply.)
As soon as a 1D algorithm is found, the search stops and the same sequence of sub-shapes is checked to find the main and additional 1D hypotheses, which can be taken into account by the found 1D algorithm.
The multi-dimensional algorithms have a higher priority than uni-dimensional ones if they are assigned to sub-meshes of the same priority.
If meshing parameters are defined on sub-meshes of the same priority, for example, different 1D hypotheses are assigned to two faces sharing an edge, the hypothesis assigned to a sub-shape with a lower ID will be used for meshing. You can change mutual priority of such concurrent sub-meshes.
Construction of a sub-mesh consists of:
To construct a sub-mesh:

"Create Sub-mesh" button

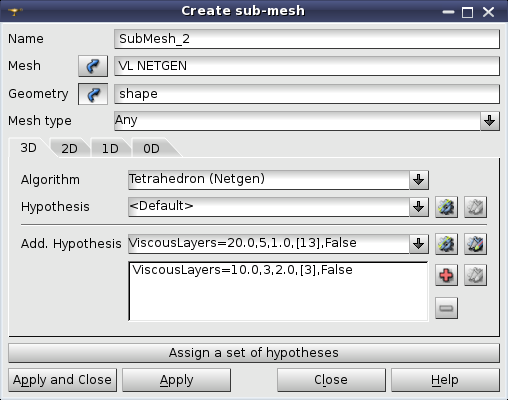
It allows to define the Name, the parent Mesh and the Geometry (e.g. a face if the parent mesh has been built on box) of the sub-mesh. You can define meshing algorithms and hypotheses in the same way as in Create mesh dialog.
Later you can change the applied hypotheses or their parameters in Edit mesh/sub-mesh dialog. Mesh entities generated using changed hypotheses are automatically removed.
If the parent mesh is already computed, then you can define the Geometry by picking mesh elements computed on a sub-shape of interest in the 3D Viewer, i.e. you do not have to extract this sub-shape in Geometry module beforehand. To start element selection, press Selection button to the right of Geometry label. If this button is already down, then click it to release and then click it again. The following pop-up menu allowing to choose a way of geometry definition will appear.

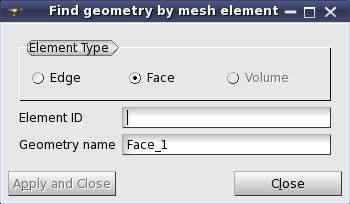
Direct geometry selection enables selecting the sub-shape in the Object Browser. Find geometry by mesh element selection activates the following dialog.

In this dialog, Element Type defines a kind of element to pick in the Viewer. Instead of picking an element in the Viewer, you can type its ID in Element ID field. Geometry name field allows defining a name of the sub-shape, with which the sub-shape will appear in the Object Browser (if not yet there).
In the Object Browser the structure of the new sub-mesh will be displayed as follows:

It contains:
See Also a sample TUI Script of a Construct Sub-mesh operation.